Monday, January 28, 2013

Mason Jar Cakes

Valentine's Day makes me so happy. Forget the lovey-dovey, mushy-gushy, couple stuff. I love love love the adorable treats. Recently, I've seen pretty much anything put in a mason jar, so I decided to do the same. This recipe is red velvet cake and cream cheese icing, which I made with shortening instead of butter so it would stand up a bit. I turned the mason jar upside down and pressed it into the cake, then used a spoon to push it down to the bottom. I swirled the icing around with a star tip, then repeated the process again. The tags are just printed on cardstock and tied on with ribbon. Simple and adorable!
xoxo,
Alexis


Friday, January 25, 2013

Heath Bit Chocolate Chip Almond Cookies

          After some hard core baking, aka cake making, I needed to do something refreshing and easy. These cookies fit the bill--one bowl, all day long.

1 cup unsalted butter
2/3 granulated sugar
2/3 light brown sugar
2 eggs
2 1/2 cups flour
1 tsp baking soda
1/2 tsp cornstarch
1/2 tsp salt
1 tsp vanilla extract
5 oz Heath toffee bits
3/4 cup semi-sweet chocolate chips
1/3 cup chopped almonds
*updated 3/30/14

1. Cream butter and the two sugars together.
2. Add each egg, incorporating completely
3. Add vanilla
4. Sift together flour, baking soda, and salt together, then add to the mixer.
5. Stir in toffee bits, chocolate chips, and almonds.


Just a yummy, simple recipe for your weekend! It would be great for upcoming Superbowl parties or Valentine's goody bags.

xoxo,
Alexis


Red Velvet Cakes and Happy Birthdays

        The summation of southern living can be told through recipes--Fried chicken, Pecan Pie, Corn Bread-- This past Thanksgiving presented a challenge to me, how to conquer red velvet cake. To so many people, red velvet cake means something different. I, for one, remember my great grandmother Lucile's red velvet cake. I remember her warm smile and kind nature. Although I do not have her recipes, I hope to have at least some of her soul.

Turns out, I must have something. The red velvet cake was enjoyed by all. In fact, I received a special request to make it for an upcoming birthday. This birthday boy is a lot like my grandma Lucile--warm and strong with a smile that just makes you feel easy. (Easy Like Sunday Morning)...

Paula Deen's Red Velvet Cake:

1 teaspoon vanilla
1 cup buttermilk
1 teaspoon salt
2 1/2 cup cake flour
1/2 lb (2 sticks) butter
1 ounce red food coloring
2 tablespoons cocoa
2 cups sugar
2 eggs
1/2 teaspoon baking soda
1 tablespoon vinegar

Cream Cheese Frosting:
 8 oz. Cream Cheese
1 cup unsalted butter
1 tsp vanilla extract
4 cups powdered sugar

Preheat the oven to 350 degrees
1. Always begin with room temperature butter, unless otherwise noted (ex. pie shells). Cream butter and sugar with mixer until fluffy. Do not over-mix.
2. Add in eggs, one at a time, incorporating them completely into the batter.
3. In a small bowl, stir together the food coloring and cocoa until it is paste like.
4. Sift flour and salt together in a large bowl.
5. In another small bowl, stir the baking soda with the vinegar.
6. Alternate adding the flour mixture and the buttermilk (beginning and ending with the flour).
7. Add in vanilla
8. Add vinegar mixture.

I usually use a cup measure to evenly pour batter
into three 8 in. pans. Bake for 20-25 minutes.


For the icing, beat the room temperature cream cheese and butter together, add the powdered sugar, and then the vanilla. (It really is that easy).


For the "Happy Birthday," I painted fondant cut outs with a pearl dust and lemon extract mixture. The fondant process is here. I finished it off with some dollops of frosting, topped with pecans, and gold sprinkles. I hope this bit of nostalgia translates into your lives and you too can feel the warmth of old southern hospitality

xoxo,
Alexis

Wednesday, January 23, 2013

Bebe Shower

          As an alumnae of Huntingdon College, I can say that one of my true gifts was surely the travel experience. After graduating this past May, I had the privilege of traveling abroad to Austria and Germany. It was truly magnificent. Huntingdon is taking a class this spring to Paris. The jealousy oozes out from my soul like chocolate in a fondue pot. But, I will go someday. It will be sublime. In honor of my jealousy, I recently made Parisian themed cookies and later decided to create a party theme around it. What is more beautiful than Paris in the spring? Perhaps only new life itself--


Sale - ROYAL HANOVER Porcelain Bavaria Germany HMS Tea // Roses //Vintage China Set // Cottage Chic // Pink Roses
all4mybelle
Teleflora's Recipe for Romance Flowers
                        California Blooms                 Teleflora's Recipe for Romance        
                                            

Available for purchase in my etsy shop
  ETSY

xoxo,
Alexis

Monday, January 21, 2013

Fond of Fondant

      If you're like me, you dream in Cake Boss episodes, your greatest fear is giving an artificially flavored cupcake to the judges of Cupcake Wars, and you frequently mourn the loss of Ace of Cakes. Okay, so you're probably not like me, but do still "ooo" and "ahh" at amazingly smooth and beautiful cakes. The otherwise impossible feat of making cakes perfectly smooth is made possible through a little magic called rolled fondant. I've visited the store a million times and saw buckets of rolled fondant , contemplated the difficulty level, and run as fast as possible in the other direction. Then, I discovered it could be made with a few simple ingredients. Hmm. Light bulb moment. No one would have to know.
Recipe:
13.5 oz mini marshmallows
2 tbsp water
almond extract
4-8 cups powdered sugar (up to 2lbs)

(Mini Marshmallows come in bags of 10 oz. What's up with that? This being my first time making this fondant, I just bought two bags and used 1 full bag and 1/3 of the second bag. My guess is that you could use just one bag and a little less water.)

1. Put the marshmallows in a large microwavable bowl, pour the water over top, and place in the microwave for 1 min 20 sec.

2. Mix in the almond extract. Be careful how much you use. I suggest one cap full (I used two and it was too much).

3. Use shortening to coat your mixer's bowl. You can either take the time to do this or take the time to soak it later. I chose the second option, and it wasn't too bad.

4. Pour your marshmallow mixture into the mixer, which needs to be fixed with a dough hook. One by one, add the first four cups of powdered sugar, allowing each cup to incorporate into the marshmallow mixture.

5. Add the remaining powdered sugar until the mixture begins to form a ball that separates from the hook. When you touch it, it should not stick to your hands at all.

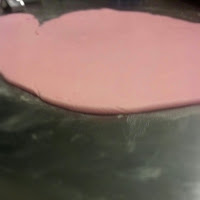
6. Rub that shortening on your hands and the surface you're using to knead the fondant. Knead the mixture until it is an even consistency.

kneading the fondant                         plastic wrap for storage  
  
knead in color with glove                     after about 5 minutes 
(3 drops red for baseball size)  
Roll out to 1/4 in thickness                heart cookie cutter set ($2)
 
  alphabet cutters- Michael's ($17)
let the cutouts harden on a cookie sheet covered with wax paper
 Rolled out to cover mini heart cake. 
Maybe 1/8 in thickness


I still have over half of this recipe left. Don't let fondant intimidate you one second longer! This was easy and relatively quick. I can now say, I am rather fond of fondant.
xoxo,
Alexis

Friday, January 18, 2013

Ganache Forgives; I Don't.

This is my boyfriend. My boyfriend likes to workout. My boyfriend like to listens to intense rap music when he works out. While I do not share his enthusiasm for the rap game, I recently had a spat with what seemed to be a delicious cake, which would be just as easy to make. It wasn't easy. Equally NOT easy has been finding a name for my blog. But, when in doubt, make cake. I sat there so angry, trying to fix a that crumbled cake, thinking the entire time that I would never forgive the blogger who was successful with this recipe. Luckily, the recipe for the frosting was actually a ganache--thick, flowing ganache. Ahah! Like Tina did Ike in the limo, it finally hit me! Ganache forgives...I don't (see Rick Ross GFID).

So now that I have a proper name for my blog, I guess I'll share the cake that brought about this roller coaster of unfortunate and fortunate events. I give you the three layer, strawberry filled, chocolate cake of horror:

Okay, so it's more like a horror film of the black and white variety in which there is a great lead up to a horrific creature, and then the revelation of this creature is totally underwhelming. Sorry, I was determined to succeed.

The recipe is from recipe girl:
CAKE:
3 ounces fine-quality semisweet chocolate, chopped (I used Ghirardelli chocolate chips)
1 1/2 cups hot brewed coffee
3 cups granulated sugar
2 1/2 cups all-purpose flour
1 1/2 cups unsweetened cocoa powder (not Dutch process)
2 teaspoons baking soda
3/4 teaspoon baking powder
1 1/4 teaspoons salt
3 large eggs, at room temperature
3/4 cup vegetable or canola oil
1 1/2 cups buttermilk
3/4 teaspoon vanilla extract
FROSTING:
1 pound fine-quality semisweet chocolate, chopped (I used Ghirardelli chocolate chips)
1 cup heavy whipping cream
2 tablespoons granulated sugar
2 tablespoons light corn syrup
1/2 stick (1/4 cup) unsalted butter, cut into small pieces
FILLING:
One (10-ounce) bag frozen raspberries, thawed
1/4 cup sugar
1 Tbsp. cornstarch

Rule number one, when someone says put parchment paper on the bottom of a pan, do it. 
Anyway...
Preheat oven to 300 degrees. Grease three 8-inch cake pans. Line bottoms with rounds of parchment paper, then spray paper too. Set aside.
In a medium bowl combine the chocolate and hot coffee. Stir together and let sit until chocolate is melted. Set aside.
In a large mixing bowl beat eggs for 3-5 minutes. Add oil, buttermilk, vanilla, and coffee until well combined. In a separate bowl combine sugar, flour, cocoa powder, baking soda, baking powder, and salt. Add dry ingredients to wet ingredients, mixing just until combined.
Divide batter amongst the three pans and bake for 55-60 minutes, or until toothpick inserted into center comes out clean.

Meanwhile, bring the cream, sugar, and corn syrup to a boil over medium heat. Remove pan from heat and stir in chocolate until melted. Add butter and stir until smooth. Transfer to a bowl and place in refrigerator until it reaches spreading consistency (mine took about 45 minutes).

To make filling, puree strawberries in a blender or food processor. Transfer to a small saucepan and combine with sugar and cornstarch. Stir constantly over medium low heat. Mixture will thicken as it boils. Let cool completely before use. (I strained my strawberries into the saucepan.)

To assemble the cake, run a small knife around the cake edges and remove from pans. Get out that ganach (resisting the urge to devour it) and put a layer of it on the cake. Spread half of the strawberry filling over the top of that. (I also sliced strawberries and arranged them here.) Top with second layer do the same as the first layer. Place final layer on top then cover and frost with ganache.

Sounds easy enough, right? haha. Here is the first layer of ganache. Rocky Mountain Top? To fix this cake, I simple did a "crumb coat" of ganache, put in the freezer for thirty minutes, took it out, and put a final layer of ganache on it.

 I ran a mile and a half for three bites of this cake. It was worth every bit of the heartache. Did I mention I also made fondant for the first time today? That would explain the decorations, just to set up the next post.
xoxo,
alexis

Tuesday, January 15, 2013

Rain, Rain, Go Away

Rain, rain, go away, come again another day. Exactly what I have been thinking all weekend. Unfortunately, the weather is unchanged by my lullaby. However, fortunately for me, a little sunshine could be ushered in with a tasty, and quite precious treat!

What else would I be doing on a dreary day than perusing the internet for beautiful confections? Nothing. Although, I finally decided to act on my research! I would make a cake that might just replace my long sought after billowy clouds and clear blue skies. I was determined to be successful.

The cake was just a simple boxed chocolate cake, but the icing was the adventure for which I longed. 
 The recipe is adapted from i am baker:
  • 6-7 cups powder sugar (I used seven and it was really sweet)
  • 1 cup butter flavored shortening
  • 2 tsp vanilla extract
  • 1/2 cup milk

 A "crumb coat" just to seal the cake and create an even base. I usually put it in the refrigerator/ freezer so it sets up, but I didn't do that with this icing recipe, and it held up really well.
 I added a rose detail to the top with a star tip, and my boyfriend had his crafty moment with the dots at the bottom (because at the end of the day, it's all just fun)!
It was the first time I ever used decorating tips. I'm pretty happy with the end result. A little shabby chic, if you ask me. Not a bad way to cheer up a rainy day!
xoxo,
alexis

Happy Hunger Games

A little sugar never hurt anyone, or so I like to tell myself. The holidays this year were filled with sugar cookies for my family. I finally discovered fool proof methods and recipes that I was able to duplicate and have the same result. This is a first for me. Surprisingly, I have the hardest time with cookies out of any baked good. Mostly, I end up with very flat cookies. Well, I didn't see the part of the recipe that said magic, but apparently, when combining all these ingredients, that's what I get every time!  

This cookie recipe is borrowed from allrecipes:
1 1/2 cups butter, softened 
2 cups white sugar 
4 eggs  
1 teaspoon vanilla extract   
5 cups all-purpose flour  
2 teaspoons baking powder  
1 teaspoon salt

Cream together butter and sugar until smooth (I use a Kitchen Aid stand mixer) . Beat in eggs and vanilla. Stir in the flour, baking powder, and salt.
  Once I'm done mixing, I like to take a spatula and pour the dough out onto plastic wrap, wrap it up, and put it in the freezer for a while. The dough must be chilled for at least an hour, or else it becomes unmanageable.
Take it out of the freezer 10-20 minutes before you want to roll it out, and put back what you don't need while rolling out some of it. The great thing is, this dough does not spread like others that I have used, so long as it is chilled. When I roll it out, it's maybe 1/4 in thick, almost where I think the shape of the cookie will be lost in baking. Just before I put them in the oven, I like to sprinkle them with sugar because the dough is almost like a shortbread. I bake them at 375 until the edges are just the slightest golden color.
Some family fun with the sugar cookies! For the icing, I used powdered sugar, milk, corn syrup, and vanilla. The consistency was much like Elmer's glue--slightly runny, but controllable. I paint it on with just a normal, very small tip paint brush. The icing will set up in 10 minutes or so, but should sit longer if you are wrapping them up.


A designed set for the Moorer family

A pastel Christmas
Happy Hunger Games, and may the odds ever be in your favor!
xoxo,
alexis