Thursday, October 31, 2013

Trick or Treat

No Such Things as a Bad Apple, but there might be a bad apple pie...
You know how something looks like a good idea, but something inside you hesitates just a little. Listen to your instincts. Maybe you have seen the pictures swirling around with beautiful rings of apples which look like roses. Run. Or, at least read how not to burn them. Don't "wing it" like I did.  Now that I have sufficiently warned you, let me talk about pie. Apple pie.

This recipe is delicious. Seriously. I have made other apple pie recipes, but finally I got the nod of a approval from my husband last night. This is it. Forget some fancy topping. Apple pie is classic for a reason--it's simple. Maybe I'm just bitter; apple roses ain't for apple pie.

Alright, this crust could be used for any pie. It's just enough sweet and salty without being either. It's so simple too!
1.) Mix 1 1/2 cups flour with 1 tsp sugar.
2.) I used 1 stick of salted butter, so I skipped the salt in the dry ingredients.
3.) Not owning a pastry blender or food processor makes one do things old school. So, if you're like me, you can mix the butter and dry ingredients by hand for about 5 minutes.
4.) Add 4 TBSP of ice water, 5 if it's too dry. Mix until just combined
5.) Wrap in plastic wrap and place in freezer for 15 minutes or the fridge for up to a day.
6.) Do it again. Or, you could just do double the first time.

For the filling, peal, core, and cut 5 (green) apples. Once you're ready swear off baking for the rest of your life, look up, and before you will be all your apples in a bowl. Now, add 2TBSP flour, 1/2 cup white sugar, 1/4 cup brown sugar, and 1 tsp cinnamon. Mix it all up until evenly coated.


Take your pie crusts out of the freezer and--ON A FLOURED SURFACE WITH A FLOURED ROLLING PIN-- roll out half the dough. Sorry for raising my voice, but it's important. Transfer the first disk of dough to the pie pan and then pour in the pie filling. Roll out a second disk and cover the filling. Punch some holes with a fork to avoid pie-xplosion. You can choose to add decoration or not. Put the pie in the oven at 375 until it is golden on top. Do check the apples though. If they are not done, cover it with foil and put it back in the oven.

Like I mentioned, I spent a LONG time on these roses just to watch them burn. I removed them from the crust and kept baking until it was golden. That pie was in at 375 for a while... but it was worth it all. Tricked then treated?


Monday, October 28, 2013

B is for Breakfast and Basketball

I don't only eat desserts.(surprise!) During basketball season, things change for our family. We start eating better, more balanced meals. We eat less sweets, sigh. To turn my frown upside down, I like to embrace the change and make life just as delicious as all the other times of the year. So, B is for breakfast and basketball season. Ahh, the inspiration behind it all:
Breakfast and basketball haven't always been part of my life, but in 2011, I started to warm up to change. My heart was broken when I rooted for the Heat in the finals and they lost in an UGLY fashion. Breakfast and basketball were in the doghouse. However, soon we would all be one happy family. Fast forward to this year, and I literally have one happy family. We celebrate you--breakfast and basketball. 


Today I reveal some secrets about breakfast.
Eggs are excellent.
  • If you like scrambled eggs, use low heat to break up the protein, making them fluffy without milk--just keep working them with a spatula!
  • If you like fried eggs, to make a healthy version, use a small bit of olive oil just to coat the pan, instead of butter.
  • If omelets are your thing, I got nothin'. Still a work in progress.
 Think outside of the box.
  • It is easy to go for starches like grits or sliced bread, but try something else. I like potatoes for breakfast. Here's what I do for a fast solution: microwave the potatoes and then cut them into cubes. Put them into a plan with some bell peppers and it's delicious
  • Some explanation on the bell peppers... put a little bit of olive oil into a pan and the tiny cubes of pepper on medium heat. I usually cover with a lid to speed up the cooking time. 
  • If you must, try cereals that have limited ingredients. My favorite is Kashi Cinnamon Harvest. It has like four ingredients. I reduce some blueberries and pour it over for a warm treat in cold weather. (water, blueberries, cinnamon, and truvia) 
It's the greatest time to do the right thing.
  • If you start out breakfast completely balanced, the rest of the day is downhill. 
  • In order to round out breakfast, I like to add a little fruit and maybe some more dairy like Greek yogurt--A for effort. Terry gets the sweetened stuff instead.
  • It might seem over kill, but I promise you'll be "full and focused" for hours. I'm talking superhero style. Katniss style. LeBron style.Oh, yeah and per last night--Calvin Johnson style.

Wednesday, October 23, 2013

Peanut Butter Pep Talk

Nothing screams Halloween like orange and black. This translates into chocolate and peanut butter--my first loves. So, I did what any self-respecting baker would do and I waited until my husband left to head to the grocery store. I also picked up some dark chocolate and cream cheese. Can't be anything wrong with a little more of either, right?

So glad I decided to get the cream cheese. The recipe for these brownies creates a rich, deep flavor that is unlike most brownies. The cream cheese gives it a nice tang which cuts through the often overly sweet nature of brownies. The frosting adds the sweetness back in at just the right amount.

Prepare your glasses of milk in 3..2..1..
Cream 1 stick (1/2) butter with 8 oz of cream cheese and 1 3/4 cup sugar.
Beat in one egg at a time, adding 3 eggs in all.
Add 1 tsp of vanilla.
Add 1 cup of flour and 3/4 cup of cocoa powder with 1/2 salt and 1/4 tsp baking powder.
Stir in 1 1/4 cup peanut butter chips and 1/3 cup dark chocolate morsels.
Pour mixture (more like spread the globs) into a 13x9 baking dish and bake until barely anything come out on a toothpick.


For the icing cream 3 tbsp butter with 3 tbsp cocoa powder. Add 1 cup of powdered sugar very slowly so it doesn't begin to snow in your kitchen. Add 1-2 tbsp of whole milk and then prepare to add 1-2 cups more powdered sugar. I added 1 tsp of peanut butter and 1/2 tsp of vanilla to achieve the consistency and body I wanted. There is nothing wrong with you leaving out the peanut butter in icing, which would mean you add less powdered sugar. Baking (and cooking in general) is all about doing what you're comfortable with. If you want to add or subtract something, just think it out and go with it! Chances are if you like something you make, so will others around you. Be bold; be brave. Failing is a possibility, but it makes succeeding just that much sweeter--literally. Okay, pep talk over.


Monday, October 21, 2013

Fallin' in Love with Fall

It seems that everyone I know is uh-bsessed with one thing--pumpkin. Me too. The greatest time of year is when you finally hit that one day when it is just cold enough to wear boots and you don't look crazy. That day was last Saturday. However, my date with pumpkin couldn't wait that long...

The picture says it all. These babies were moist and delicious. The frosting was creamy and sweet with a hint of cinnamon. Fallin' in love with fall.

The cupcake recipe is:
1.)Cream 1/2 cup softened butter with 1 1/3 cups sugar. Add 2 eggs which have already been beaten.
2.) Blend in 1 cup mashed cooked or canned pumpkin into the wet ingredients.
3.) In a separate bowl, combine 2 1/4 cups all-purpose flour,1 tablespoon baking powder, 1/2 teaspoon baking soda, 1/2 teaspoon salt, 3/4 teaspoon ground cinnamon, 1/2 teaspoon ground ginger, and 1/2 teaspoon ground nutmeg.
4.) Alternate adding the dry ingredients with 3/4 cup milk and stir until just combined.
Note: important with many recipes, you do not want to over mix the ingredients, as it will effect the density, rising, or texture of your goods.

Onto the icing, a simple recipe for cream cheese frosting:
1/2 cup butter
8 oz cream cheese
2+ cups powdered sugar
splash of vanilla
+cinnamon if you want
I say more than 2 cups of sugar if you want to transport your cupcakes. Most of the time I find cream cheese frosting to be the most delicious, but the most challenging frosting for decorating. I added the cinnamon too, because the cupcakes were just begging for it.

Disclaimer: these are more spice than pumpkin tasting. The pumpkin here provides texture and richness. But, that is what I look for in a pumpkin recipe.

Oh, did I forget to mention that I gave these all away! (Well, not all of them...) The wrapped box below is another great idea for holiday gifts! The boxes come in packages of 3 and it is so easy to tie a big bow and include a handwritten note. I better stop before I give all my secrets away...


Back to Basics

I am now in my second year of graduate school and enrolled in a night class entitled "Beowulf and Film." This night class requires something I am more than capable and happy to do. It requires snacks. A couple weeks ago I made this delicious treat!
There ain't nothing wrong with a good ole pound cake. I try to use some Barefoot wisdom every time I cook. This time around, I thought about Back to the Basics and really tried to focus on updating a classic recipe. My pound cake here is drizzled with an orange glaze which takes it from basic blah to bah-zing.

The recipe for the pound cake is:
1/2 pound (2 sticks) butter
1/2 cup vegetable shortening
3 cups sugar
5 eggs
3 cups all-purpose flour
1/2 teaspoon fine salt
1/2 teaspoon baking powder
1 cup milk
1 teaspoon vanilla extract 
 
As the standard goes with many cakes, cream the butter and shortening first, adding the sugar into the bowl. Next, add each egg, allowing them to be incorporated one at a time into the batter. (You can mix all the dry ingredients into a separate bowl) Finally, add the dry ingredients to the wet mixture and alternate with the milk. For the pans, use either oil or butter and cover with flour for easy release after baking. (I got a bundt and tube pan out of one recipe.) Bake for 1-11/2 hours until a toothpick comes out clean.


Let the cake cool a bit, but this isn't one of those times you have to agonizingly wait for a taste test! The glaze can be applied while the cake is still warm.

The glaze is simple:
The juice of one orange
Maybe a TBSP of orange zest
Powdered sugar 1 or more cups (to desired translucent or opaque consistency)
Note: You could use lemon, lime, orange--whatever you like really. 

With the holidays approaching quickly, I will let you in on a little secret...
If you wrap the tube cake up in parchment paper, tie ribbon or twine around it and make a tag, you have an instant (and professional looking) gift! 
 

Sunday, August 11, 2013

Wedding Bells, well actually, Wedding Cakes

People might think I'm crazy (or narcissistic), but I really wanted to make my own wedding cakes. My grandmother told me no. Absolutely NO. However, being the nontraditional couple Terry and I are, we decided to get married with a very limited crowd and then nearly a month later we would have a reception. I do recommend this to everyone. It made so many things possible. A limited budget, a stress-free wedding day, and yes, even a homemade wedding cake were now possibilities. So, we all plowed through the planning and ultimately ended up with the most magical and wonderful evening. About the cakes...

Vanilla is a standard for any gathering, and it is perfectly complimented by the most controllable, tasty vanilla buttercream. I knew this was my only option for a large and in-charge cake for 50 or more people. I had a few trial cakes too. YUM. 


Oh, and did I forget to mention a Groom's Cake? Simply the yummiest cake of all time.


Below are the final products. The vanilla cake has three layers of cake in each tier. It was surprisingly moist. I say surprisingly, because I froze the cake and frosted it while it was still mostly frozen and simply left it out to thaw on the day of the reception. (so much easier). The cupcakes were a choice based on convenience. I have used the same recipe for cakes, and while it works pretty well, it is sometimes just too moist to be layered. If you're wondering, the stand is comprised of boxes that I hot-glued and covered with burlap fabrics. Pretty creative if I do say so myself. (shamelessly patting myself on the back).


Saturday, March 2, 2013

Chocolate, Chocolate, Chocolate!

I LOVE Barefoot Contessa. LOVE.
This cupcake is for one of my other loves, Terry F. Moorer.
 
Beatty's Chocolate Cake
Ina Garten's recipe and my adjustments for 12 cupcakes:
Beatty's Chocolate CakeBeatty's Chocolate Cake
Beatty's Chocolate Cake
3/4 cup all-purpose flour
3/4 cup sugar 
1/4 cups good cocoa powder
3/4 teaspoon baking soda 
3/4 teaspoon baking powder
1/2 teaspoon kosher salt
1/3 cup buttermilk, shaken
3tbsp cup vegetable oil 
1 large egg
1 teaspoon pure vanilla extract
1/4 cup freshly brewed hot coffee 

1.) Sift together: flour, sugar, cocoa powder, baking soda, baking powder, and salt
2.) In a separate bowl, combine the buttermilk, vegetable oil, egg, and vanilla
3.) Slowly add the wet ingredients to the dry mixture. 
4.) Slowly add the hot coffee to the mixture. 

I use a tablespoon measurement to add the batter to a lined cupcake tin. I've found that 2 tablespoons in each cupcake works great! Bake at 350 degrees for 15 minutes.

For the frosting:
(Since some people are weird about raw eggs in their frosting)
1 cup unsalted butter
1-1/2 cup confectioners' sugar
2 tsp vanilla extract
3/4 cup chocolate chips
1 tbsp milk
little pinch of salt
 
 
1.) Cream the butter on medium speed for 2-3 minutes.
2.) Melt the chocolate chips (I do it in the microwave for 20 sec at a time, stirring and then returning to the microwave.)
 
3.) Add the confectioners' sugar and beat for another 2 minutes.
4.) Add vanilla, milk, salt, and melted chocolate.

 
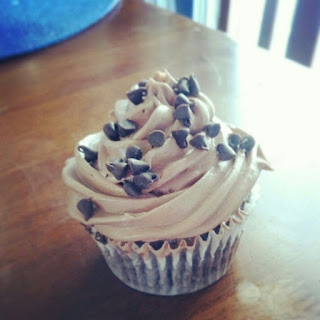
Can I be totally honest here? Terry ate like 10 of these cupcakes. No lie. The second batch didn't even make it home with us. I would say success!

xoxo,
Alexis

Friday, February 1, 2013

Learn to play nice--double doozie


As aforementioned, I love any treat that is associated with Valentine's Day.
I die for a double doozie from the cookie company. die. 
That is all you need to know. 

Last week, I made these cookies. They were really good, so I decided to use the left over dough for something a bit grander. I did add a couple chocolate chips on top of each round of dough before baking to give them a little extra chocolatey-goodness.

A basic buttercream recipe on the side of the domino bag will suffice--
4 oz (1/2 cup) unsalted butter
4 cups powdered sugar
3-4 Tbsp milk
1/2- 1 tsp vanilla extract
1/4-1/2 tsp almond extract             

I used the almond extract because the cookies have almonds in them, but also, the icing can sometimes be too sweet. The almond and vanilla combination rounds out the flavor. 

After whipping those ingredients together add single drops of red food coloring until you reach your desired intensity. (I added two.)

  Use a star tip to swirl the icing on--it works best if one cookie has most the icing, and the top cookie has a dollop too. Kinda like two like ends of a magnet, the cookies repel each other and resist the urge to sink.

     rolled in pink sugar crystals               mini chocolate chips mixed      
                                                          in (large round tip)

Unfortunately, the lemonade girl scout cookies couldn't play nicely, and rudely took over the flavor of these delights. Maybe I'm biased. I just wish my doozies would have held their own ground in that cake stand. Sad day for chocolate chip cookie lovers. I digress. I take my fight to other baking wars. 

xoxo, 
alexis

Monday, January 28, 2013

Mason Jar Cakes

Valentine's Day makes me so happy. Forget the lovey-dovey, mushy-gushy, couple stuff. I love love love the adorable treats. Recently, I've seen pretty much anything put in a mason jar, so I decided to do the same. This recipe is red velvet cake and cream cheese icing, which I made with shortening instead of butter so it would stand up a bit. I turned the mason jar upside down and pressed it into the cake, then used a spoon to push it down to the bottom. I swirled the icing around with a star tip, then repeated the process again. The tags are just printed on cardstock and tied on with ribbon. Simple and adorable!
xoxo,
Alexis